Smart items
Through the Builder, you can drag and drop smart items into a scene. These are items that have configurable parameters and actions that can be triggered, like doors that can be opened or levers that can be activated. There is a default collection of smart items in the Builder, but you can also create your own and import them.
Smart items are written using the same SDK code that you use for creating a scene, making use of entities, components and systems. This document assumes that you’re familiar with these concepts and will focus on how to encapsulate this code so that it interfaces with the scene and other smart items.
Smart item references
We recommend that you start working from an existing smart item, and use it as a template.
You can find the default collection of smart items that are in the builder in this repository:
https://github.com/decentraland/smart-items
You can also obtain the code of a smart item by using it in a scene in the Builder and then exporting that scene. The code for the smart item will be in a sub-folder of src.
The asset manifest
Every smart item has an asset.json file. This is a manifest that exposes how the item can be configured via the Builder UI, and how other items can activate it.
TIP: We recommend starting the development of your smart item from the manifest. There you can first define the item’s interface and configurable parameters, and then develop the supporting backend for that.
General item data
-
id: A unique uuid for the smart item. Thedcl initcommand generates a random value for this ID.Note: If you’re copying a project from an existing smart item, make sure you generate a new UUID for your item. Otherwise the Builder will not recognize this as a distinct item. Use uuidgenerator.net to generate a new random UUID.
-
name: Refers to the name that this model will have in the Builder UI.Note: Today, the item name that’s visible in the UI is taken directly from the name of the 3d model file. Don’t leave any spaces in the file name, use underscores to separate the words in it.
-
modelrefers to the 3D model that is used as a placeholder when dragging the item into the scene in edit mode. This can be especially useful when the item is made up of several 3D models, as you’ll want to display an alternative placeholder model that includes all the meshes together. Make sure this placeholder model has the same size and orientation as the item that will be seen in the scene. Also make sure that the item isn’t displaced via code from its default location, unless the placeholder matches this. -
tagslet you make the item easier to find when using the search. -
categoryplaces the item into a subcategory inside the asset pack, for example “nature” or “decorations”.
Parameters
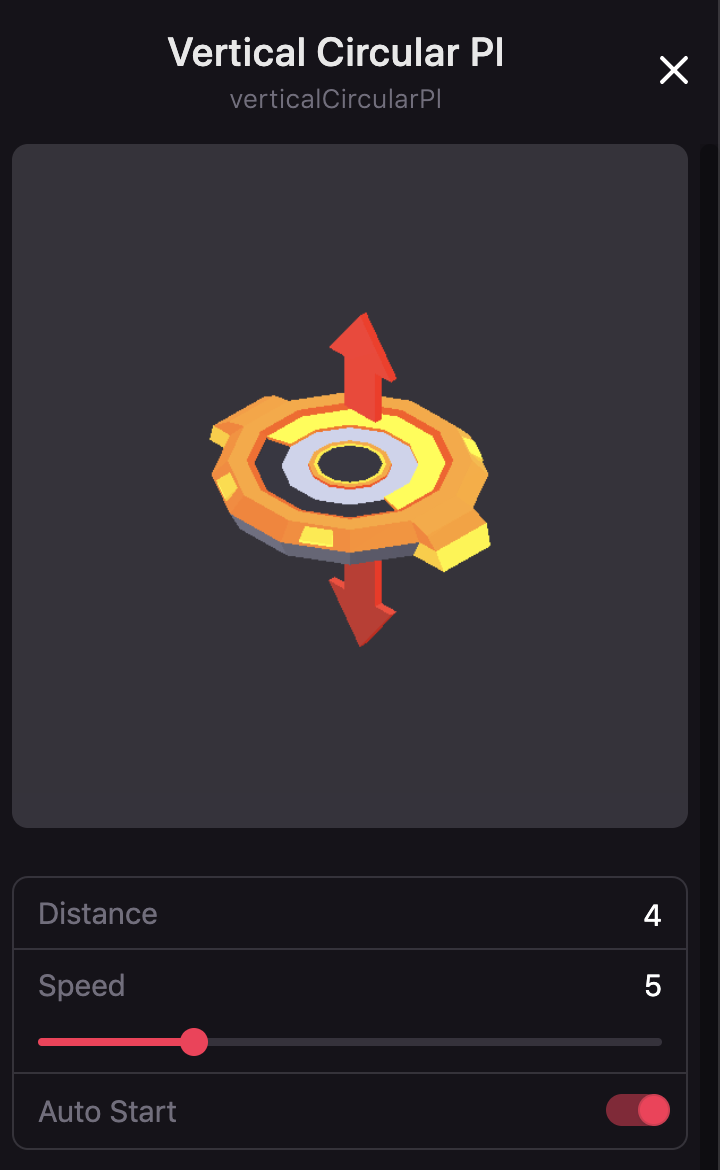
The asset.json file contains an array of parameters that can be configured via UI. The corresponding UI is generated in the Builder, automatically taking care of spacial arrangement and formatting of these menu items.
Every parameter must have:
- a
labelto display in the UI - an
idby which its value can be used in your item’s code - a
typethat determines the accepted values. The UI will change accordingly to match the type.
Parameters can also have a default value, to help make the item easier to use out of the box.
 {
      "id": "distance",
      "label": "Distance",
      "type": "integer",
      "default": 10
  },
The basic supported types for parameters are :
- text
- integer
- float
- boolean
Special types
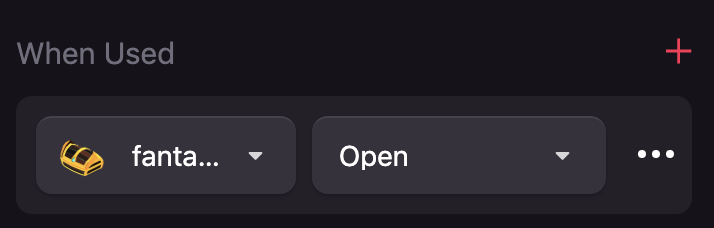
Type actions refers to an action in this or another smart item. When this type is used, the field will present two dropdown menus. One selects a smart item, the other an action from that item.
  {
      "id": "onUse",
      "label": "When used",
      "type": "actions"
    },
Note: Decorators can use the plus sign to add as many actions as they want to one single actions field.
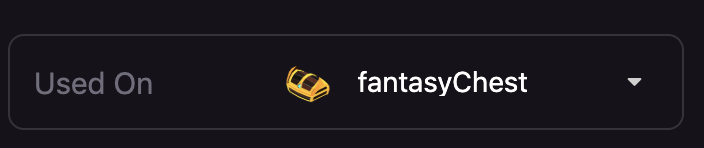
Type entity refers to another item. When this type is used, the field will present a single dropdown to select a smart item.
    {
      "id": "target",
      "label": "Used on",
      "type": "entity"
    },
Note: Decorators can add a single entity in fields of type entity.
Type textarea refers to a multi-line string, that appears in the UI as a text box.
    {
      "id": "text",
      "label": "Text",
      "type": "textarea",
      "default": "Some text"
    },
Type slider exposes a draggable slider bar in the UI. This bar has a maximum and minimum value, and moves by fixed steps.
    {
      "id": "speed",
      "label": "Speed",
      "type": "slider",
      "default": 3,
      "max": 20,
      "min": 0,
      "step": 1
    },
Type options exposes a dropdown menu with a set of options you can list.
"parameters": [
    {
      "id": "sound",
      "label": "Sound",
      "type": "options",
      "options": [
		{
          "value": "Birds",
          "label": "Birds"
        },
        {
          "value": "City",
          "label": "City"
        },
        {
          "value": "Factory",
          "label": "Factory"
        },
        {
          "value": "Field",
          "label": "Field"
        },
        {
          "value": "Swamp",
          "label": "Swamp"
        },
        {
          "value": "Town",
          "label": "Town"
        }
      ],
      "default": "Birds"
    }
]
Actions
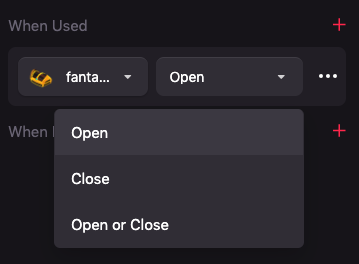
Actions can be called by this item or others to trigger a specific behavior. These don’t appear in the item’s own UI, but all fields of type actions list all of the actions available on all the items that are currently in the scene.
Actions have a label that is shown in the dropdown menus, and an id that lets you refer to this value in the item’s code.
 "actions": [
    {
      "id": "open",
      "label": "Open",
      "parameters": []
    },
    {
      "id": "close",
      "label": "Close",
      "parameters": []
    },
    {
      "id": "toggle",
      "label": "Open or Close",
      "parameters": []
    }
  ]
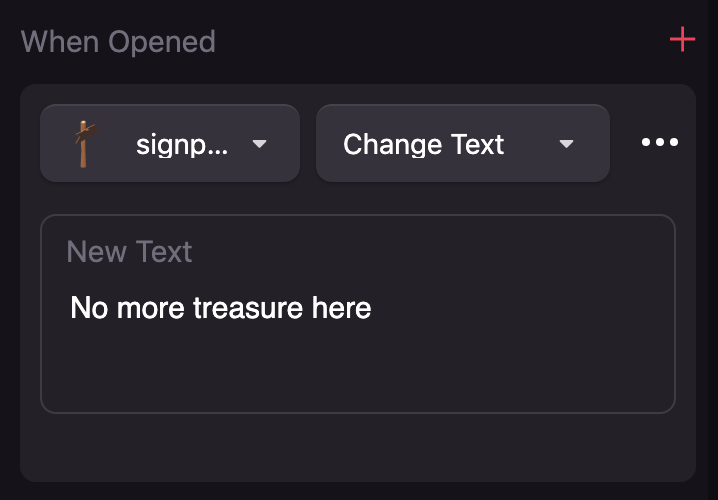
Actions can also have parameters that you can use to pass information with the action event. These parameters follow the same syntax, types and conventions as explained for the item parameters.
  "actions": [
    {
      "id": "changeText",
      "label": "Change Text",
      "parameters": [
        {
          "id": "newText",
          "label": "New Text",
          "type": "textarea"
        }
      ]
    }
  ]
Item code
The item.ts file is where you place the main logic for the item. This mainly includes creating an object that exposes at least an init() and a spawn() function.
Below is an example of the item.ts of a door smart item:
export type Props = {
  onClick?: Actions
  onOpen?: Actions
  onClose?: Actions
}

export default class Door implements IScript<Props> {
  openClip = new AudioClip("sounds/open.mp3")
  closeClip = new AudioClip("sounds/close.mp3")

  active: Record<string, boolean> = {}

  init() {}

  toggle(entity: Entity, value: boolean, playSound = true) {
    if (this.active[entity.name] === value) return

    if (playSound) {
      const source = new AudioSource(value ? this.openClip : this.closeClip)
      entity.addComponentOrReplace(source)
      source.playing = true
    }

    const animator = entity.getComponent(Animator)
    const openClip = animator.getClip("open")
    const closeClip = animator.getClip("close")
    openClip.stop()
    closeClip.stop()
    const clip = value ? openClip : closeClip
    clip.play()

    this.active[entity.name] = value
  }

  spawn(host: Entity, props: Props, channel: IChannel) {
    const door = new Entity(host.name + "-button")
    door.setParent(host)

    const animator = new Animator()
    const closeClip = new AnimationState("close", { looping: false })
    const openClip = new AnimationState("open", { looping: false })
    animator.addClip(closeClip)
    animator.addClip(openClip)
    door.addComponent(animator)
    openClip.stop()

    door.addComponent(new GLTFShape("models/Door_Genesis.glb"))

    door.addComponent(
      new OnPointerDown(() => {
        channel.sendActions(props.onClick)
      })
    )

    this.active[door.name] = false

    // handle actions
    channel.handleAction("open", ({ sender }) => {
      this.toggle(door, true)
      if (sender === channel.id) {
        channel.sendActions(props.onOpen)
      }
    })
    channel.handleAction("close", ({ sender }) => {
      this.toggle(door, false)
      if (sender === channel.id) {
        channel.sendActions(props.onClose)
      }
    })
    channel.handleAction("toggle", ({ sender }) => {
      const newValue = !this.active[door.name]
      this.toggle(door, newValue)
      if (sender === channel.id) {
        channel.sendActions(newValue ? props.onOpen : props.onClose)
      }
    })

    // sync initial values
    channel.request<boolean>("isOpen", (isOpen) =>
      this.toggle(door, isOpen, false)
    )
    channel.reply<boolean>("isOpen", () => this.active[door.name])
  }
}
Note: Keep in mind that external libraries aren’t supported in smart items, not even the
decentraland-esc-utilslibrary, so all of your item’s logic should be written using the SDK directly.
Item class setup
The init() function is executed once the first time that a smart item of this kind is added to a scene.
It’s a great place to define elements that will be shared amongst all instances of the item, like materials, a system, etc.
Item instancing
The spawn() function is executed every time a new instance of the smart item is added to the scene. This is where you should instance the entity and components of the item, as well as initiate all the action handlers.
spawn(host: Entity, props: Props, channel: IChannel)
The spawn() function takes a host entity as a parameter. This host’s positioning will be applied to the positioning of the item in the scene. Instead of adding components like a shape, audiosource, etc directly to the host entity, create a new entity and set it as a child of the host.
The props parameter will expose all the properties that are defined in the asset.josn file, calling them by the id specified for each in that file.
You should define a custom type for props, that includes the specific set of properties used by the item. You can then refer to these properties in the spawn() function via the parameter’s id: props.onClick.
The channel parameter refers to the name of the channel of communication that will be used by this smart item. Smart items use the message bus to communicate between items and to sync state changes with other players. Having separate channels for each item avoids unwanted crosstalk between unrelated items.
Handling actions
In the spawn function you should also set up handlers to respond when another item calls this item to trigger an action.
For example, a door can have an ‘open’ action, that could be called by a button, a key, or even another door.
channel.handleAction("open", ({ sender }) => {
  this.toggle(door, true)
  if (sender === channel.id) {
    channel.sendActions(props.onOpen)
  }
})
In the example above, each time an open action arrives, the door runs the toggle function to play its corresponding animation and sound and to change its state. Then it verifies that the open action effectively came from this player instance and not from another player; if so, it will call any actions that were configured to be called on the item’s OnOpen. If this check isn’t done, then the actions would be sent out multiple times, once for every player in the scene. This, besides being inefficient, can be quite disruptive when dealing with toggle-type actions.
TIP: As your item gets more complex, we recommend keeping the action handlers light, and keep most of the logic in external functions that can be called from these.
Testing your item
Use the game.ts file to test out your item just as you would test a scene. Add an instance of your item to the game.ts item, giving it a transform to position it and including all the required parameters inside an object.
import { Spawner } from "../node_modules/decentraland-builder-scripts/spawner"
import Door, { Props } from "./item"

const door = new Door()
const spawner = new Spawner<Props>(door)

spawner.spawn(
  "door",
  new Transform({
    position: new Vector3(4, 0, 8),
  }),
  {
    onClick: [
      {
        actionId: "toggle",
        entityName: "door",
        values: {},
      },
    ],
  }
)
Then simply run dcl start on the item’s folder, as you would for a normal scene. You’ll be able to interact with the item. The preview will hot-reload as you change your item’s code.
Try providing different values to the item’s properties, to make sure it functions as expected.
Importing into the Builder
When you’re ready to export the item, run dcl pack on the item’s folder. This will generate an item.zip file. Then import this file into a custom asset pack in the Builder.
You can then test it in a Builder scene. We recommend you do the following tests:
- Set different values in the item’s parameters
- Have its actions called by other items
- Call other items from it
- Add multiple instances of the item to make sure they don’t interfere with each other
If this all works then congratulations, you have a fully stable smart item!
Storing state data
Your item might need to store information at an instance level. For example, each door needs to keep track of if its open or closed, but other more complex items might keep track of more information about themselves.
The example above uses a list of booleans to represent the open/closed state of each door, where the entity name of each door is used as a key. For items with more information, it’s advisable to instead define a custom component that holds all of the data of the item.
When instancing an item in the spawn() function, you should then add this component to new items.
TIP: We recommend defining the custom component in a separate file from
item.ts, to keep your code cleaner.
It’s important that you name your custom components with unique names that shouldn’t overlap with names used by other smart items. We recommend including the item name as part of the component name to avoid this. Otherwise, conflicting smart items in a same scene could interfere with each other in unexpected ways.
Custom systems
If you need your item to perform a gradual action that is executed frame by frame, like moving or rotating (not by animation), then you need to define systems to carry this out. Delaying an action also requires creating a system that waits x milliseconds.
NOTE: The
decentraland-ecs-utilslibrary can perform many of these actions in a scene’s code, but this library is not supported in smart items. Any transition needs to be explicitly written as a system.
As with custom components, systems need to have unique names that don’t overlap with those of other smart items used in the same scene. Again, we recommend using the item name as part of the system name to avoid this.
Note that besides defining the system, you also need to add an instance of it to the engine. The ideal place for that is in the init() function of the smart item, which is executed once when the first item of this type is added.
TIP: We recommend defining systems in a separate file from
item.ts, to keep your code cleaner.
Multiplayer behavior
All the smart items that are available by default in the Builder have multiplayer capabilities. They achieve this by using the message bus to send peer to peer messages between players every time that something changes.
Since the state of the item is shared amongst peers, if all players leave the area of the scene, the state of the item is no longer stored anywhere, and it reverts to its initial state.
To keep the state of your smart item in sync between players, make sure that any relevant changes send out messages via the item’s channel for other instances to follow it.
When new players join the scene, make sure that they obtain any relevant information from other players about the current state of the item. For example, to do this, the door item sends out a channel.request when spawning, and if there are any other players with instances of that door there should be code that will reply with a boolean indicating if the door is currently open.
// we send a request to all other players
channel.request<boolean>("isOpen", (isOpen) => this.toggle(door, isOpen, false))

// we respond to this incoming request from other players
channel.reply<boolean>("isOpen", () => this.active[door.name])
In some cases, you might not want the actions of a player affecting others. For example, when one player picks up a key, you don’t want all players to have that key equipped. To avoid this, you can filter the sender of a message and only react when it matches the channel id.
channel.handleAction("equip", (action) => {
  if (!this.isEquipped(key)) {
    // we only equip the key for the player who triggered the action
    if (action.sender === channel.id) {
      this.equip(key)
      channel.sendActions(props.onEquip)
    }
    // we remove the key from the scene for everybody
    this.hide(key)
  }
})