Wearables Editor User Guide
What is the Wearables Editor?
The Wearables Editor is a tool within Decentraland’s Builder that allows you to upload, add metadata to, and publish your own custom wearables.
Remember: these docs don’t explain how to create the models, meshes, and textures that make up wearables, they just explain how to use the Wearables Editor to upload and publish your wearables. For an intro on the actual wearable creation process, start here.
Logging in
To start uploading and publishing your wearables, navigate to builder.decentraland.org.
Click Sign in, and then Connect to log in with your Metamask or Fortmatic wallet. After signing in, click the Collections tab.
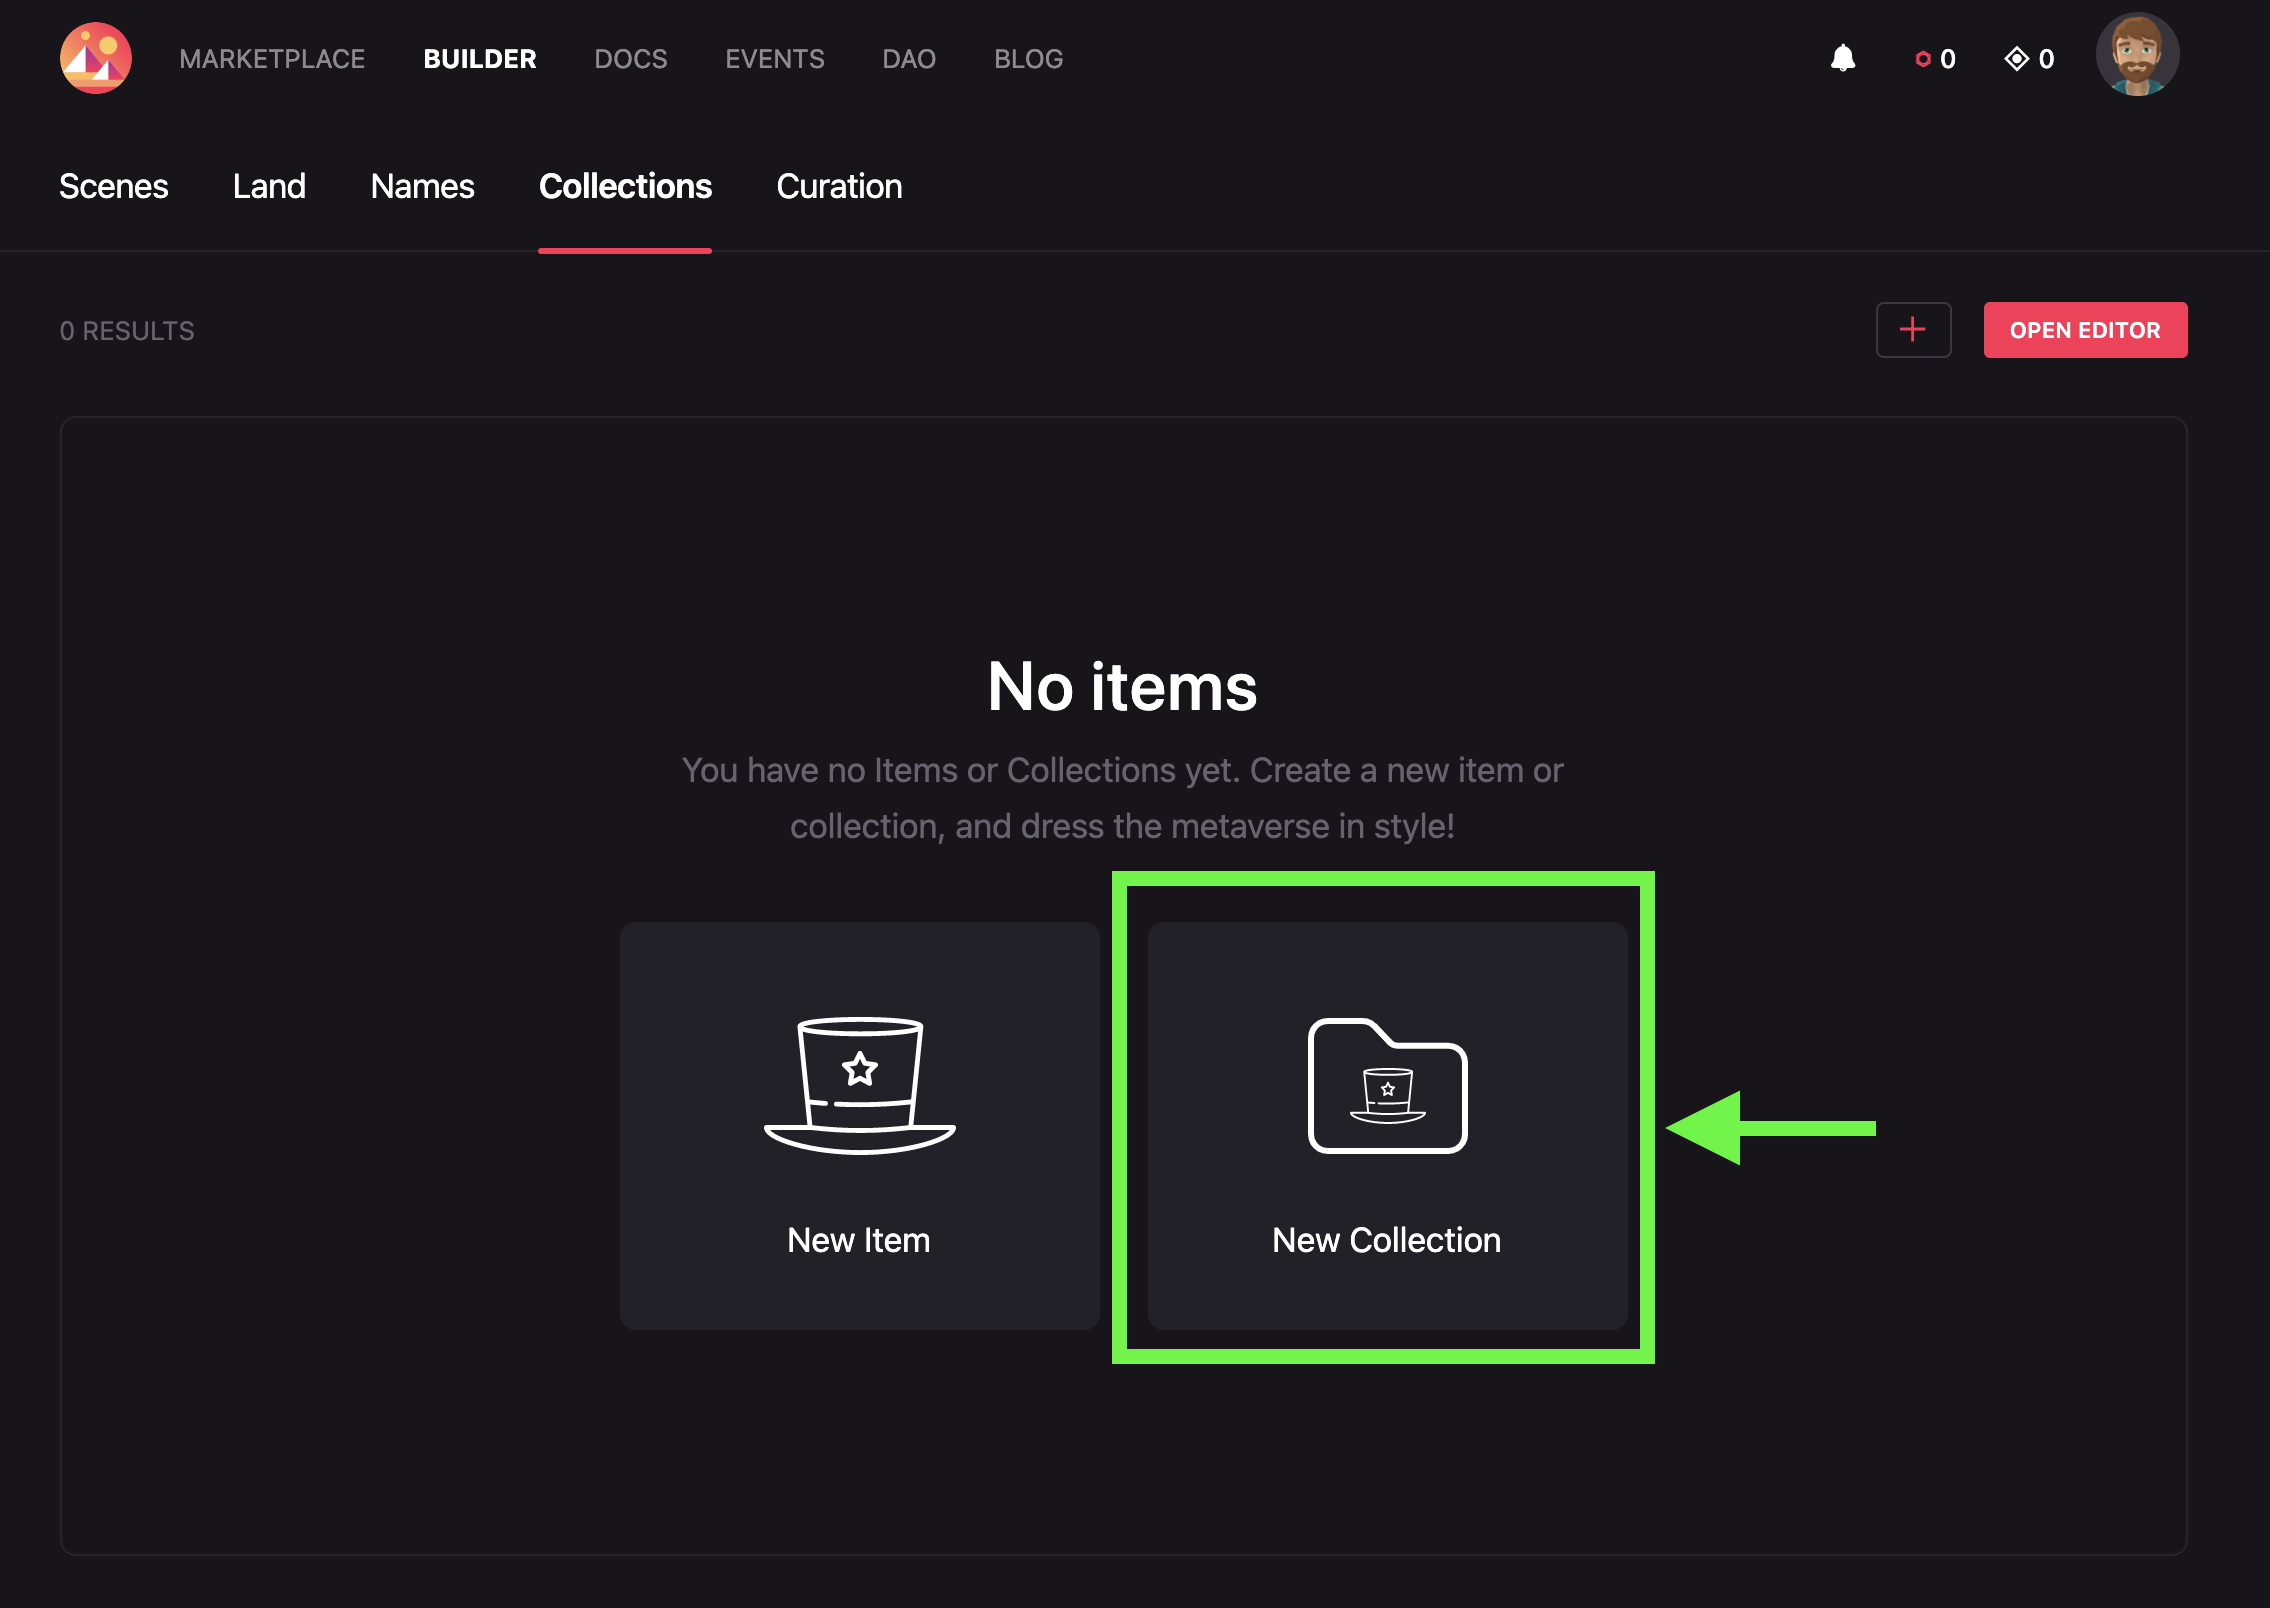
Uploading wearables
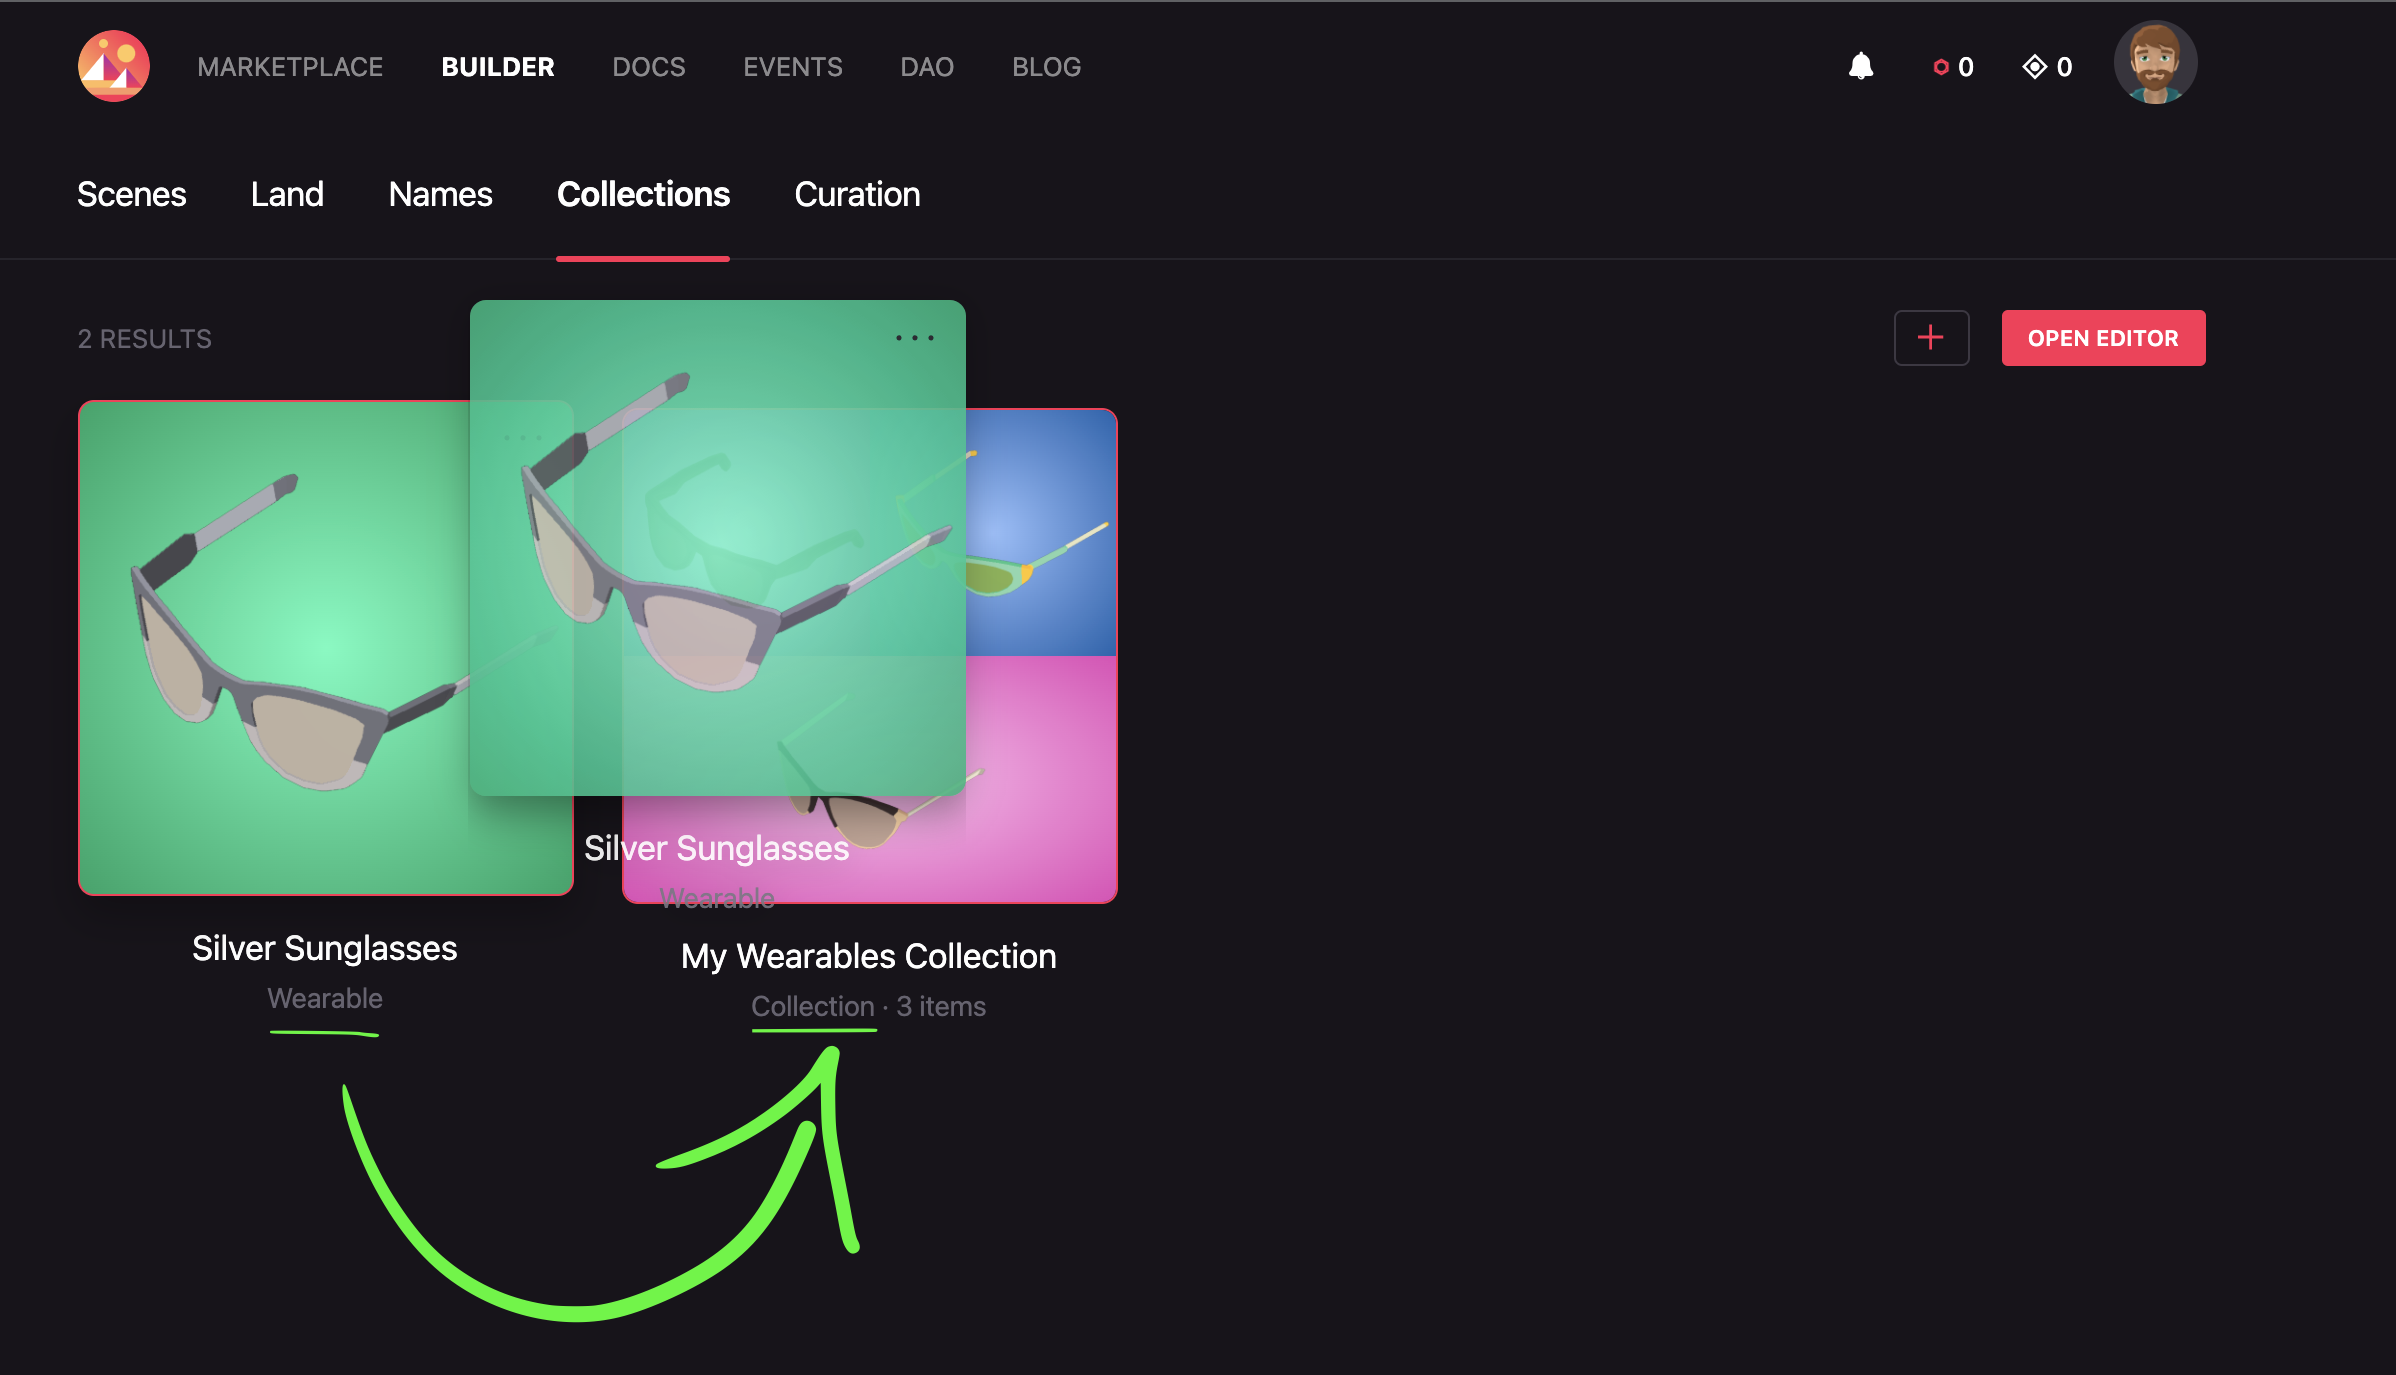
If you haven’t uploaded any items yet, click New Item or New Collection to get started. If you’ve already uploaded some wearables, you can either edit them by clicking on the item or collection and then clicking Edit, or you can upload new wearables by clicking the + icon next to the Open Editor button.
Creating a collection
When creating a collection, first enter the name you would like to give your collection and click Create. After creating your collection, you can begin adding items.
The name of your collection cannot be changed after publication!
You can add as many items as you want until you publish your collection. Always remember, you cannot add, remove, or change the rarity of items in published collections.
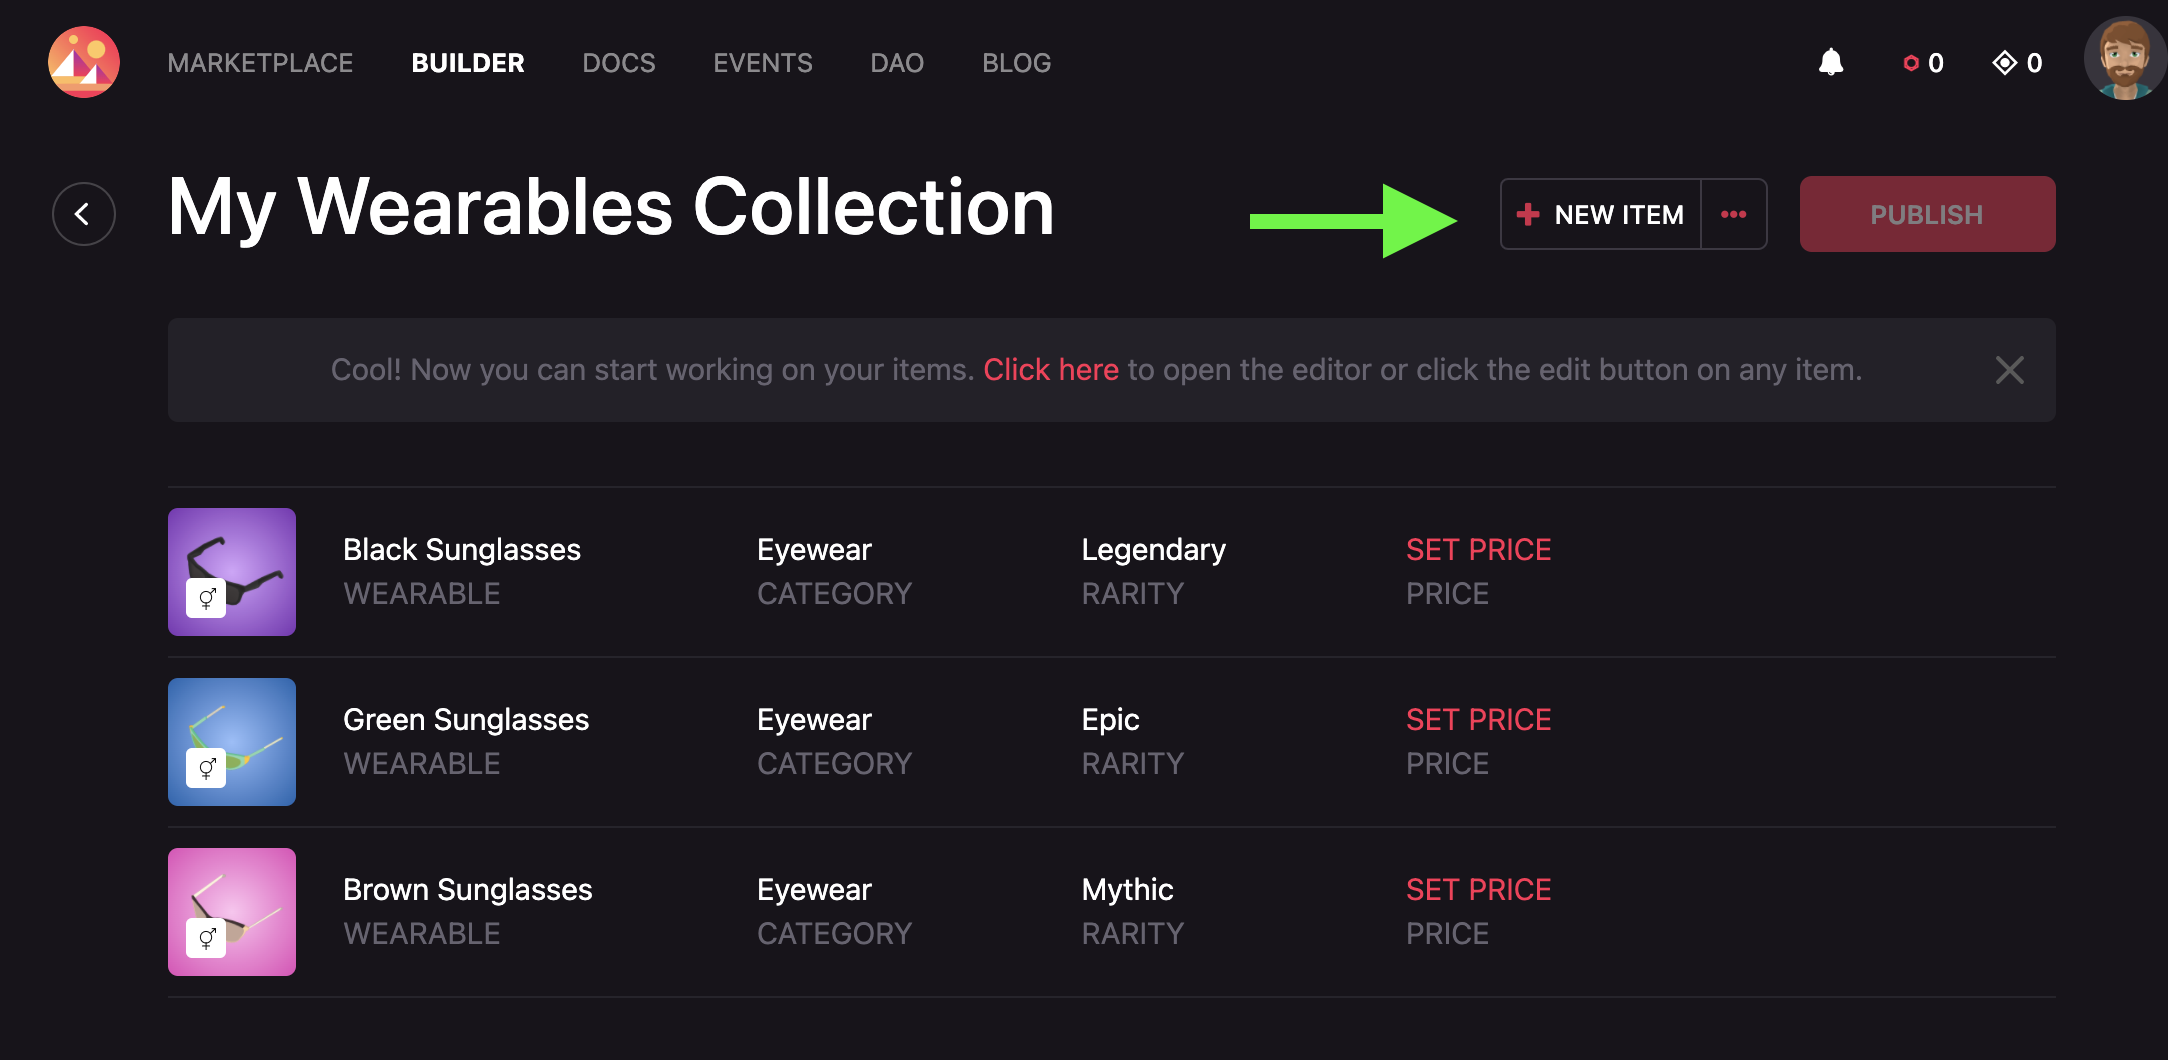
To add an item to your new collection, select the collection, click New Item, and select your wearable files.
Also, you can create your items first and then drag and drop to your collection!
Uploading an item
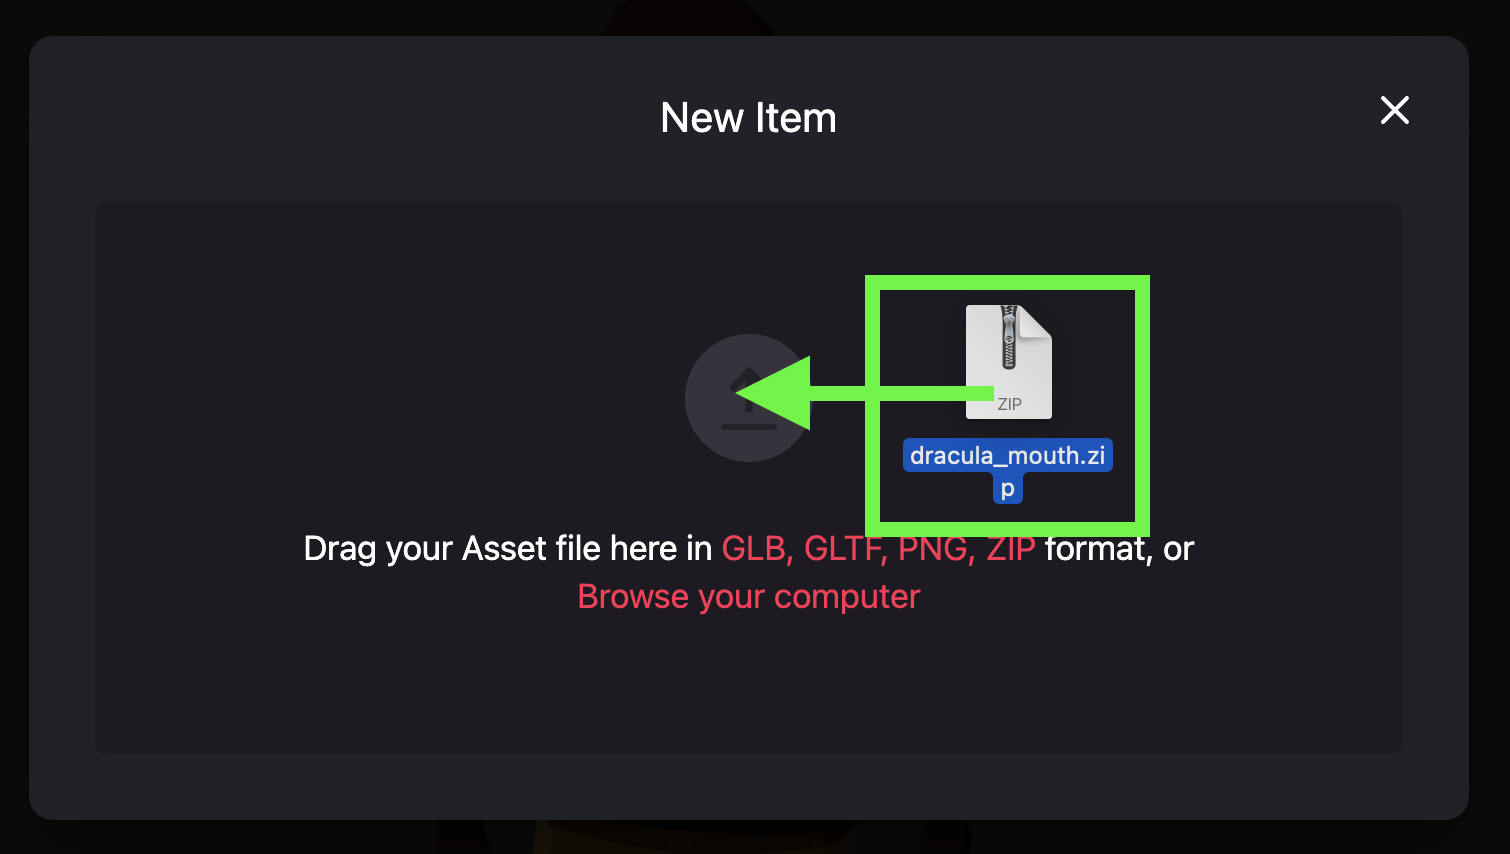
When uploading an item you can either browse your computer to find the file you want, or you can click and drag your file right into the editor. For an overview of the 3D file types supported in Decentraland, see 3D Model Essentials.
Wearable items cannot currently exceed 2MB.
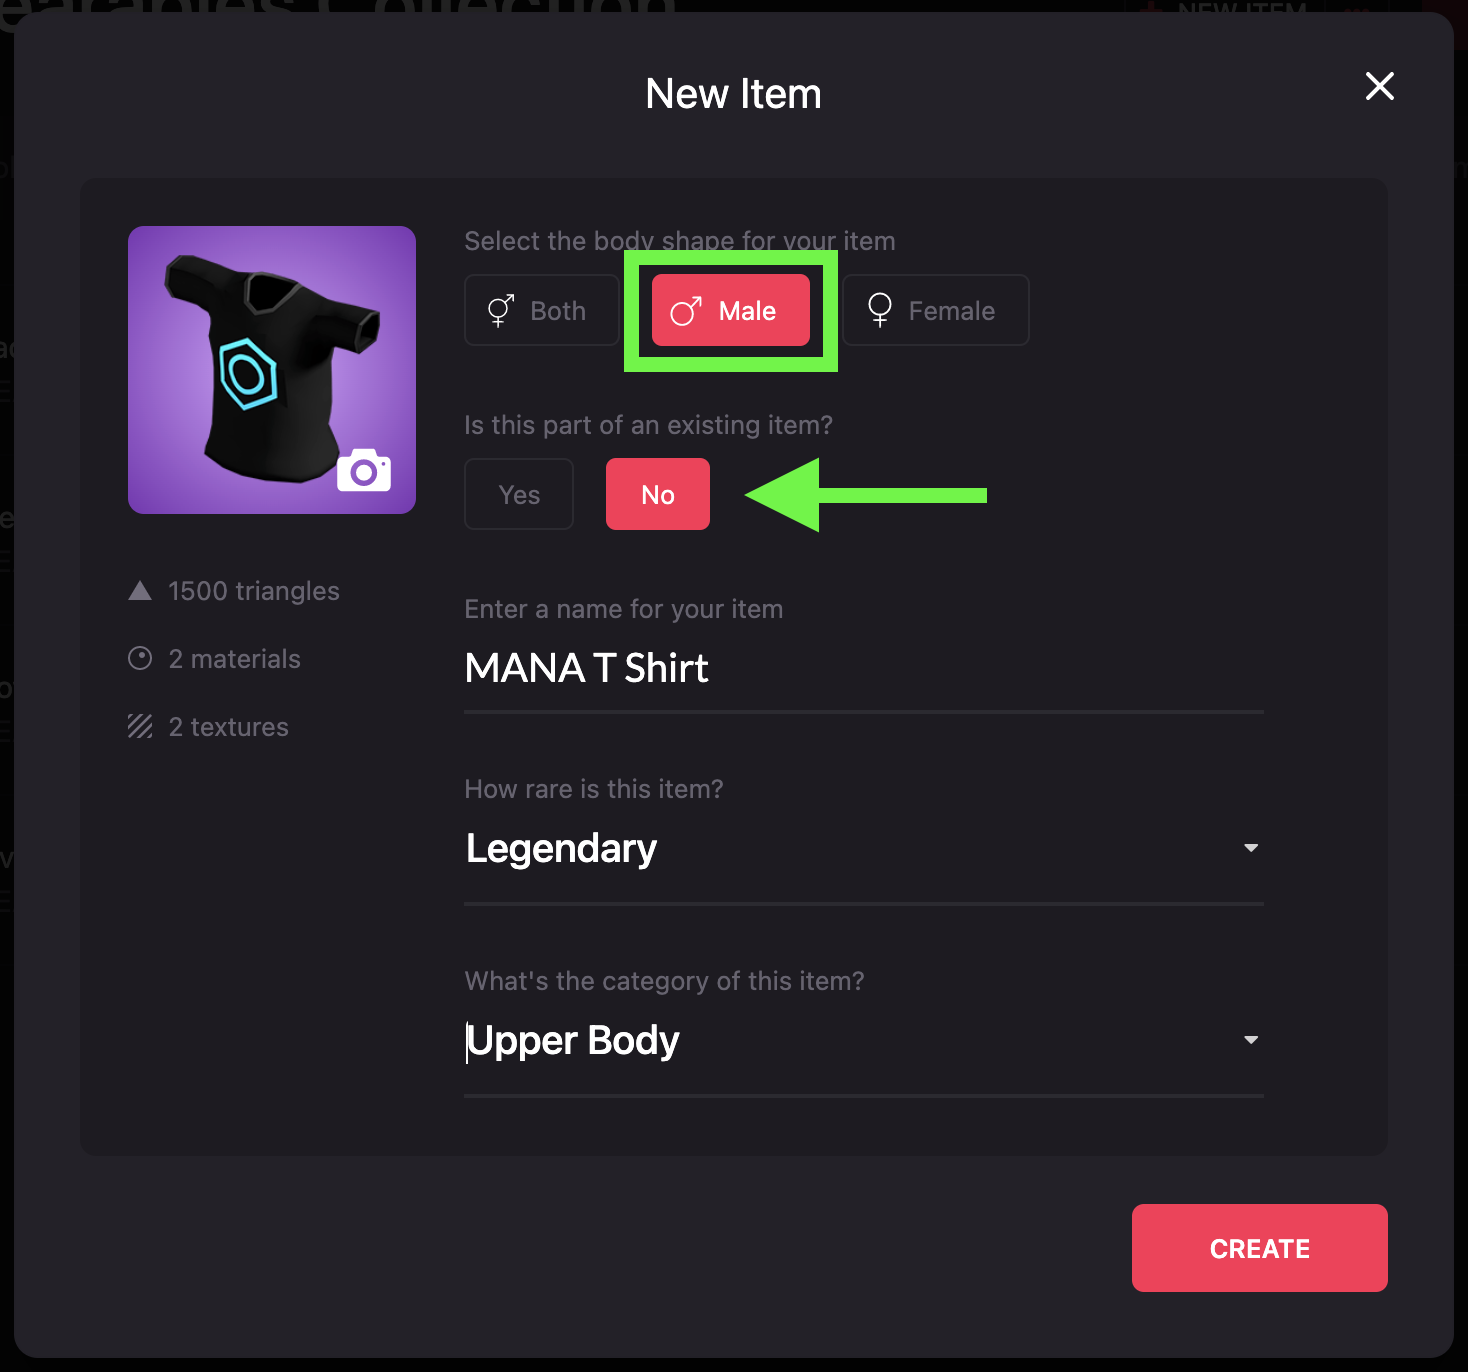
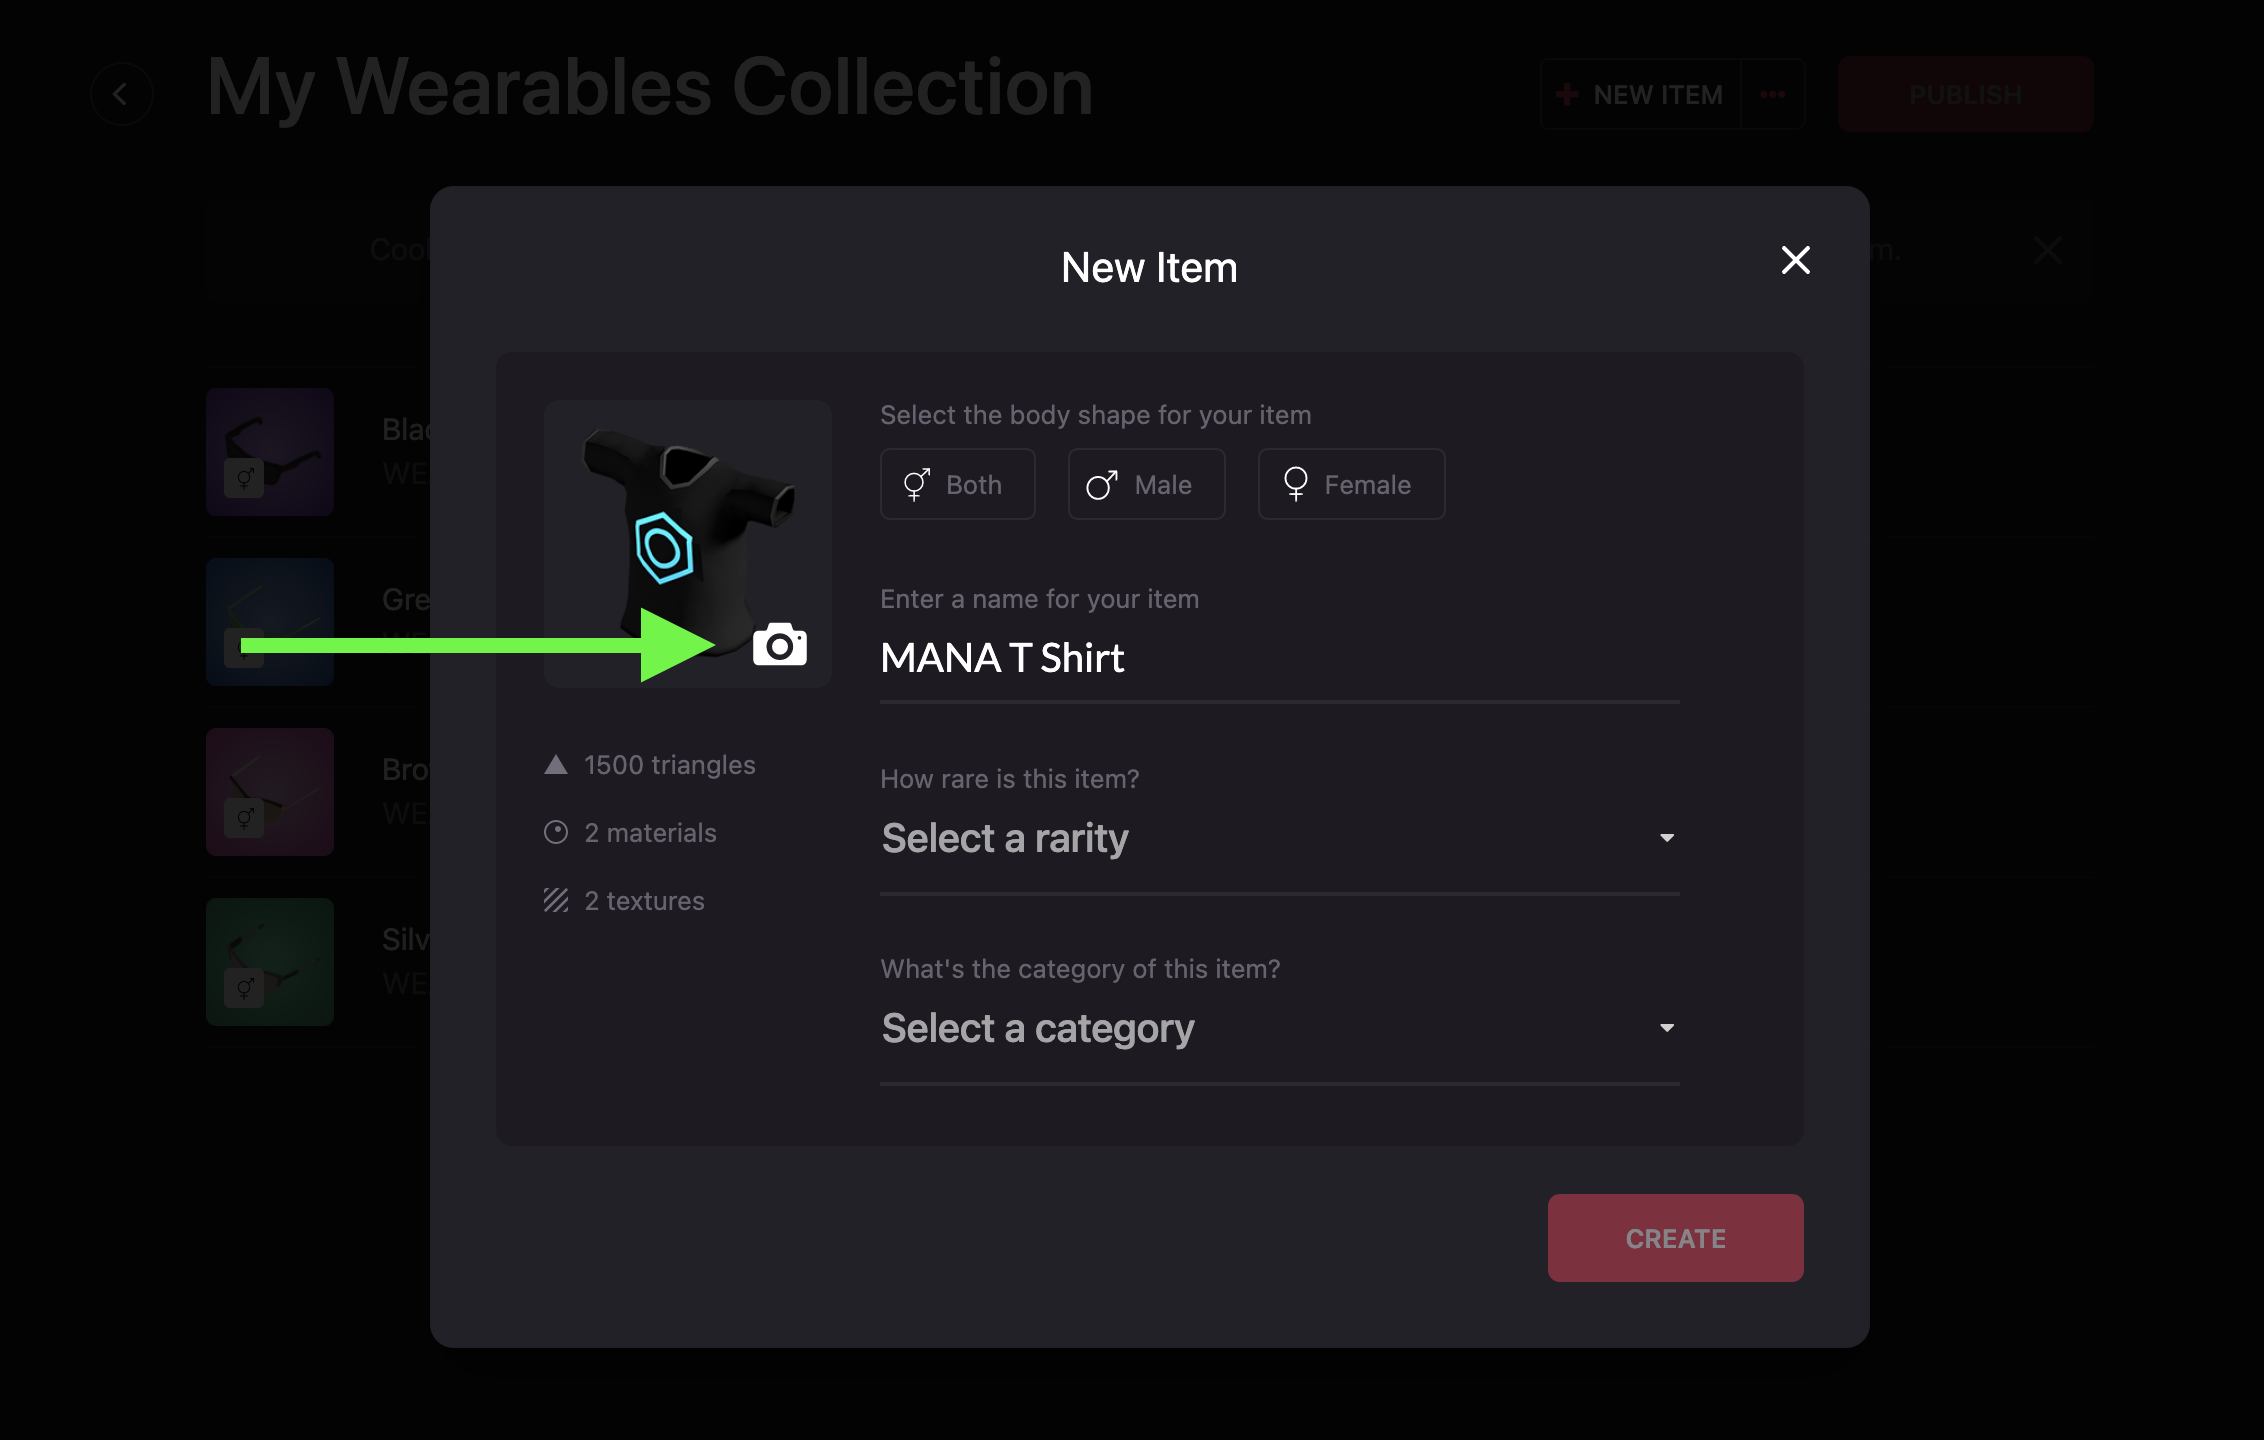
After uploading your file, you will be prompted to enter some descriptive information:
Body shape You can select which body shape your wearable is modeled for. The shape can be either A, B, or both. Wearables that are set to Shape A can only be worn by wearables with Body Shape A, while wearables set to Shape B can only be worn by avatars with Body Shape B. If you set the shape to Both, then avatars of both shapes can wear your wearable.
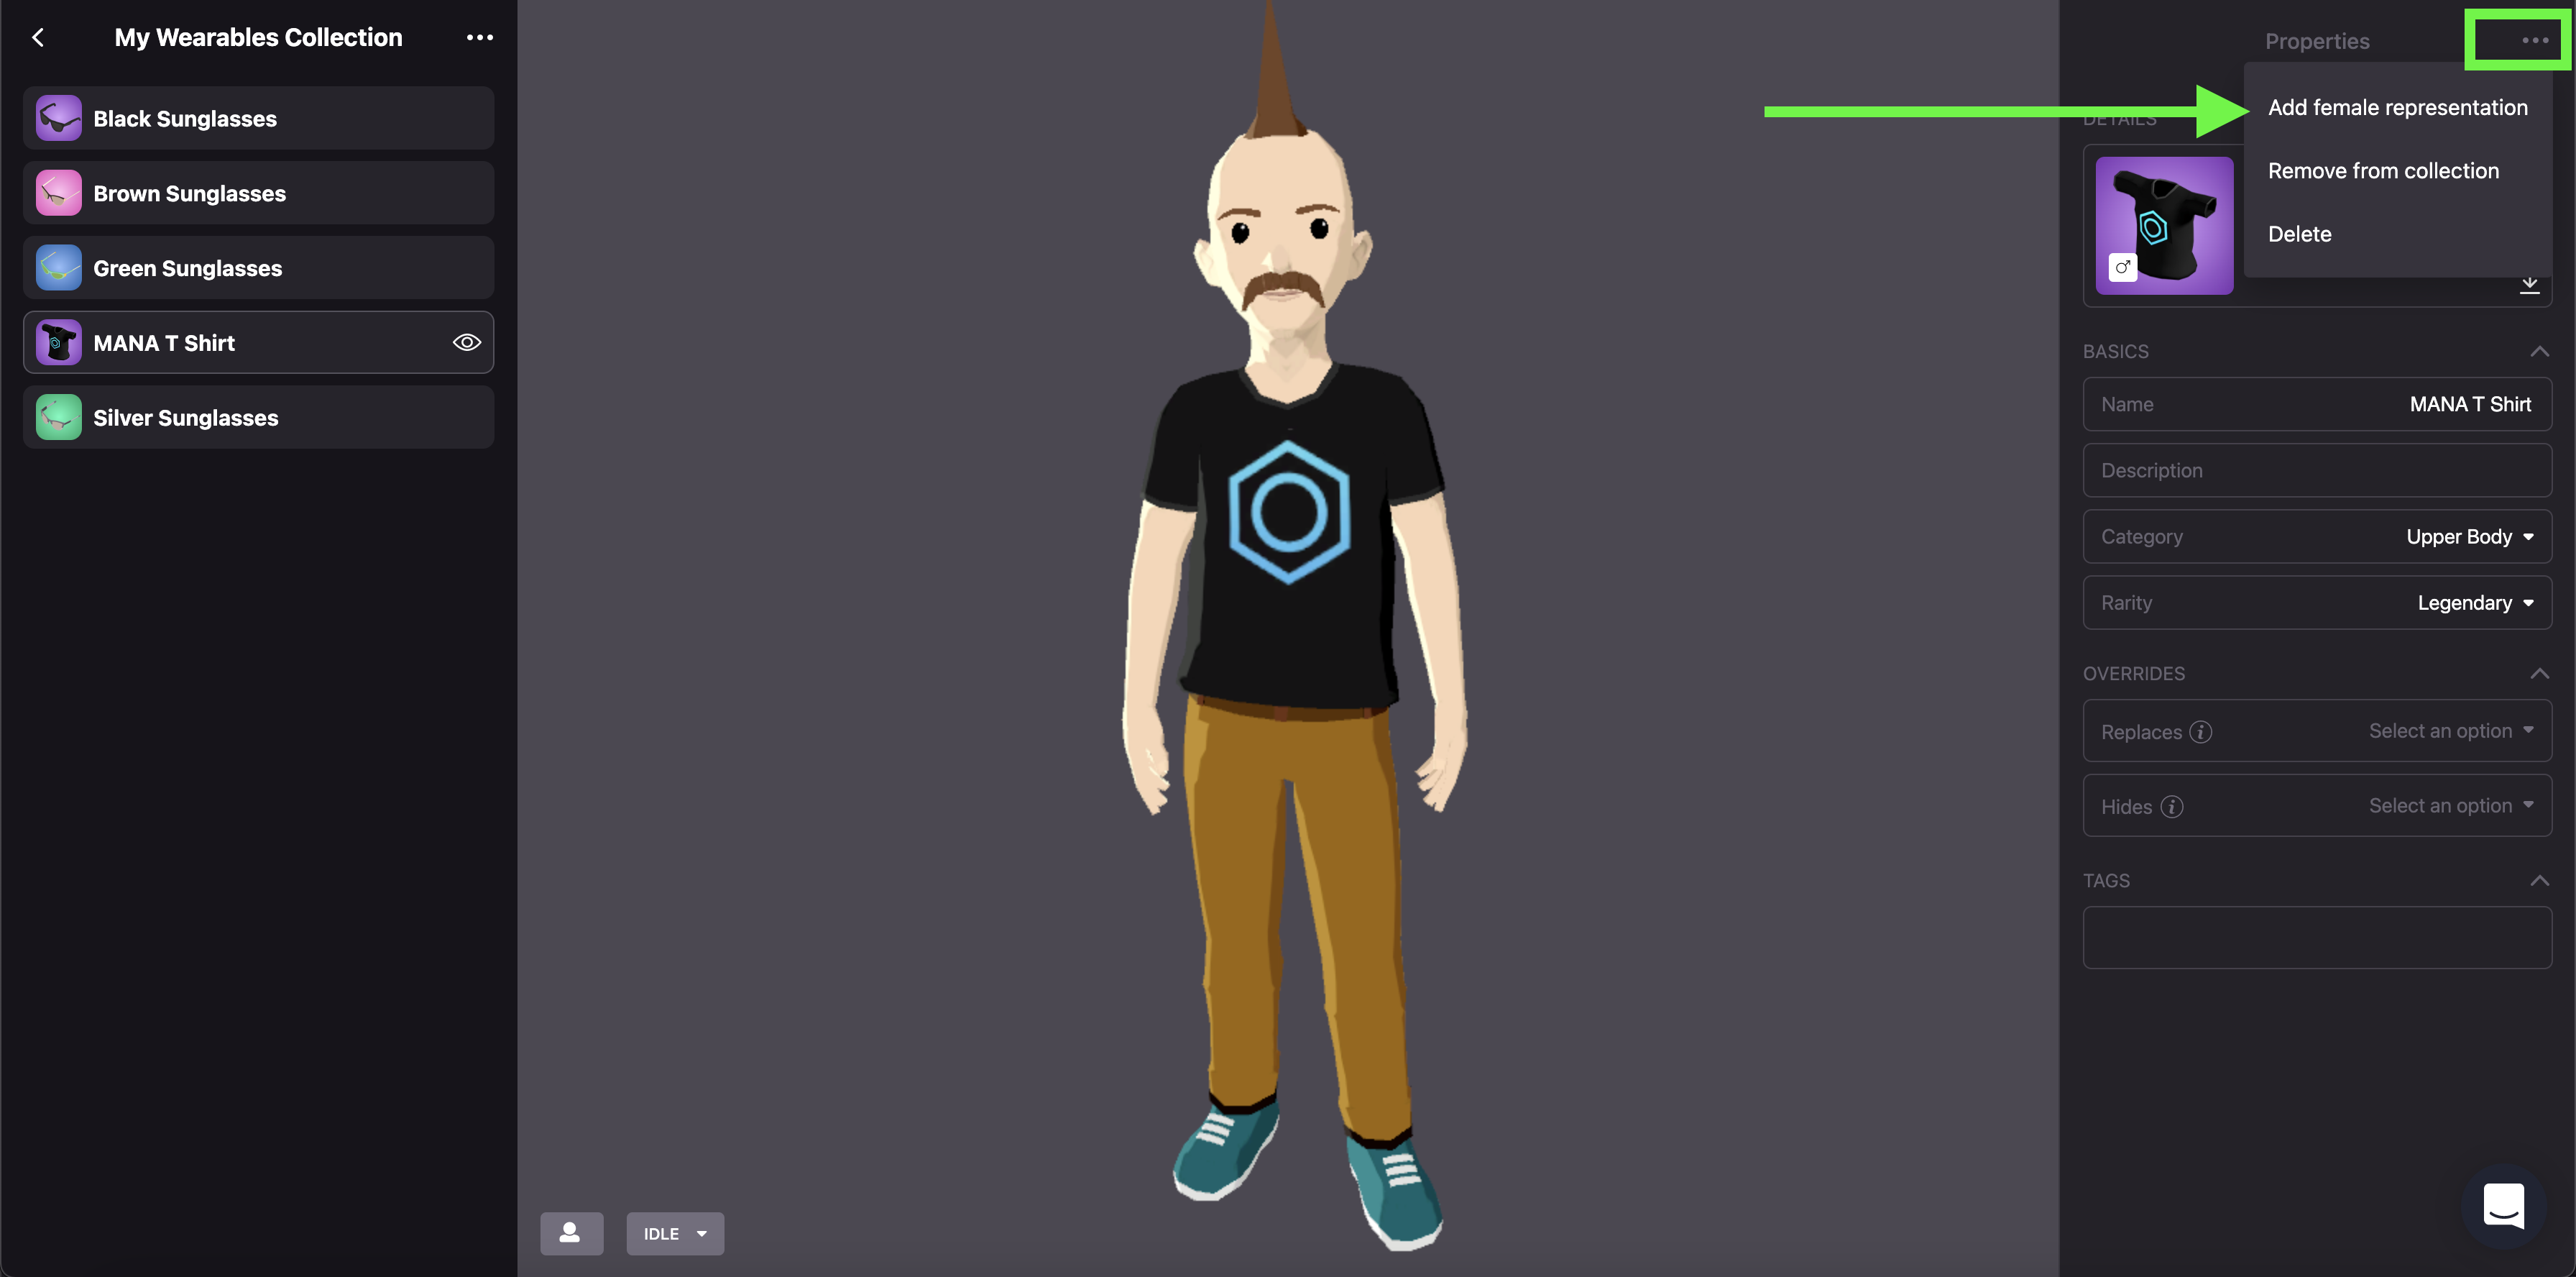
To submit a wearable that has more than one representation first upload one of them, add rarity and category and hit create:
Then, in the editor tool, go to properties and add the other one.
Uploading Mouth, Eyes and Eyebrows
The mouth, eyes and eyebrows category have a different behaviour in the tool, because these are just .pngs files. To upload these just drag and drop the png file as a transparent image (256px X 256PX). Mouth is going to be automatically tinted by skin color, same for the eyebrows tinted by the hair color.
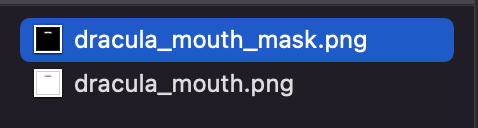
If you want the asset to be masked, so a part of the mouth or eyebrows is not affected by the tinting you would need to both zip files and then drag them to the tool. Note: remember that png name of the mask should end with suffix “_mask” in order to work.
To upload eyes tinted by eye color feature follow the same process. More info here: https://docs.decentraland.org/decentraland/creating-wearables/
Name The name you would like to give your wearable.
The name of your collection cannot be changed after publication!
Rarity The rarity of your wearable determines the total number of NFTs that may be minted based on your item. The rarities and the maximum number of NFTs that you may mint for each are:
| Rarity | Limit |
|---|---|
| Unique | 1 |
| Mythic | 10 |
| Legendary | 100 |
| Epic | 1000 |
| Rare | 5000 |
| Uncommon | 10000 |
| Common | 100000 |
Category Wearables are organized into different categories, depending on what part of an avatar they modify. Select the appropriate category for your item:
- Earring
- Eyewear
- Facial Hair
- Feet
- Hair
- Hat
- Helmet
- Lower Body
- Mask
- Upper Body
- Tiaras
- Top Head (Top Head wearables can be either an item of effect that is applied to the top of the head, like an angel’s halo.)
- Skin
When you’re finished entering your descriptive metadata, click Create.
Editing items
To edit your items, navigate to the Builder and select the Collections tab. Here, you’ll find all of your wearable collections and items. You can edit an individual item by clicking on the item, and then clicking Edit. To edit an item that is part of a collection, first select the collection, and then the item within the collection you’d like to edit.
Details
The item details list the number of triangles, materials, and textures that make up your wearable. It is recommended that you do not exceed the following limits when creating wearables:
- 1500 triangles per wearable (except skin category)
- 500 triangles per accessory
- 2 square textures of 512x512px (or lower)
- 5k triangles for skin category and 5 textures of 512x512px (or lower).
If the number of triangles and textures exceeds these guidelines, you can click the pencil icon to upload a new model, or “representation” of your wearable with lower triangle/texture counts. You can also change the preview image by clicking the camera icon when hovering over the preview thumbnail.
Basics
This is the basic metadata you entered when you first uploaded your item. You can edit this information at any time leading up to the moment you publish your item within a collection.
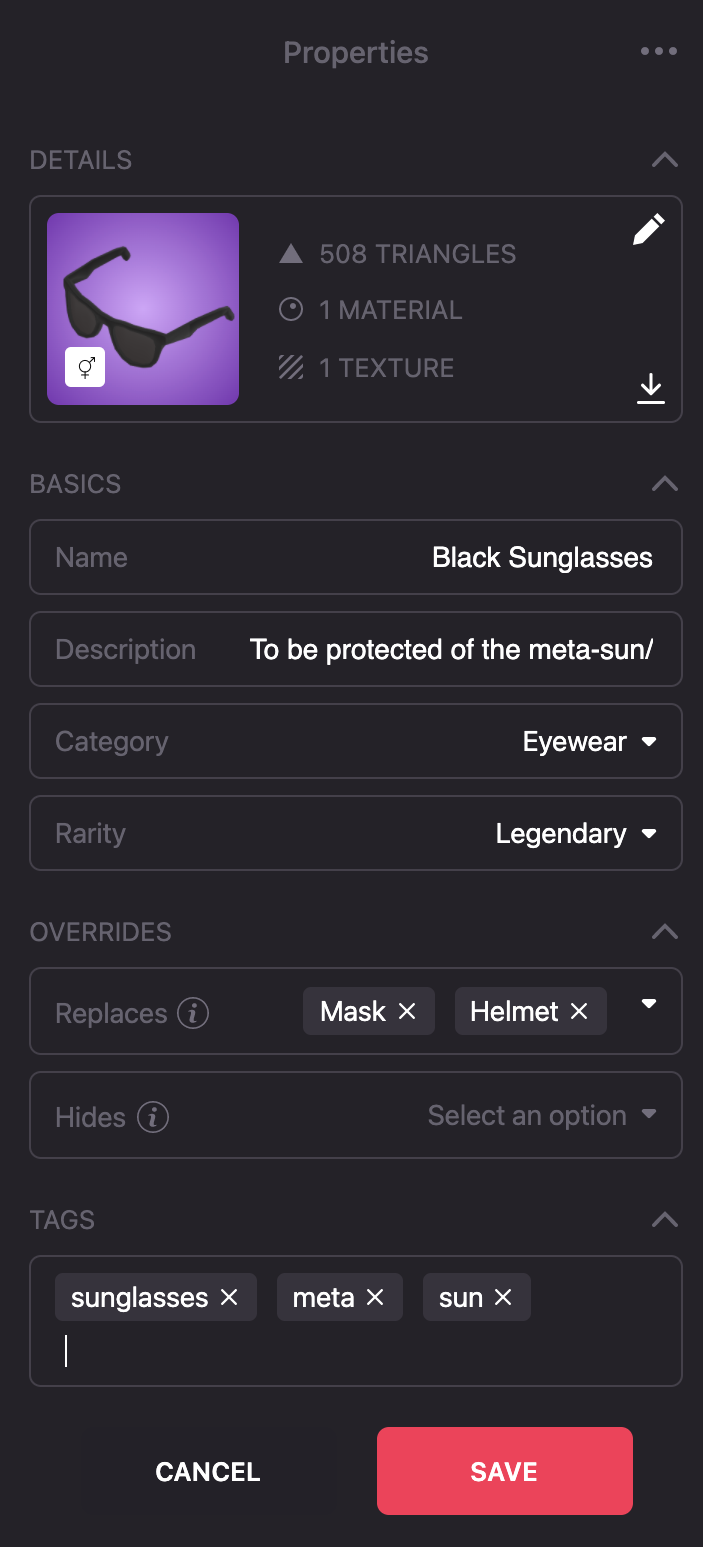
- Name - the name of your item, this will be displayed when distributing your wearable on the marketplace
- Description - a brief statement describing your item, this is displayed when distributing your wearable on the marketplace
- Category - the component of an avatar’s body that your wearable modifies
- Rarity - the rarity determines the maximum number of NFTs you will be able to mint of your wearable after publication. This is the only property that cannot be modified after publishing a collection.
Overrides
Overrides determine what other wearable categories your item will either replace, or hide. When setting overrides, you simply select a wearable category from the dropdown menu to add it to the override. You can add multiple categories to each override.
Replaces Any items within the categories added to this override will be unequipped from a users’ avatar when they equip your item. A user would have to re-equip any “replaced” items after unequipping your item. This does not delete items, it only unequips them.
Hides Any items within the categories added to this override will only be hidden (they won’t be rendered) when a user equips your item. When a user unequips your item, the hidden items will be rendered again automatically.
Tags
Tags are simply descriptive words that users can use when searching or filtering for items. These could be relevant to competitions or events!
Custom thumbnails
You can upload your own custom thumbnails for wearables in your collections. To upload a custom thumbnail image, navigate to the Wearables Editor and open the item you want to add a thumbnail for. Click Edit and then click on the thumbnail image under details to upload an image from your computer (a camera icon will appear when you hover over the thumbnail).
Thumbnails must be a
.pngfile and 1024px by 1024px with transparent backgrounds. Collections containing thumbnails without transparent backgrounds will not be accepted by the Curation Committee.
Setting the price for items
Items that are included in a collection can include prices that you set for their primary sale.
To set the price of a wearable, navigate to the Builder and select the Collections tab. Then click on the collection containing your items you want to price.
For each item in the list, click Set Price.
Price
The price that a user will have to pay in a primary purchase (the first purchase after minting) for your item. Prices are set in MANA. Remember that when you mint wearables, they are minted directly on Matic/Polygon. When a user purchases your item, the transaction will be conducted in Matic/Polygon MANA.
Beneficiary
The Ethereum address that will receive the MANA in a primary sale of your wearable. You can use any Ethereum address you like. To automatically fill in the address you’ve logged in with, click I’m the Beneficiary.
You can also click Make it Free, to set the price to 0 MANA and the beneficiary address to a null address. This means that your wearable will be free for the primary sale, but it could be sold for a price in any secondary sale.
After setting the price and beneficiary address, click Submit.
Publishing items
The DAO is currently voting on the addition of publication fees for wearables. Until the addition of a fee is decied on, and the size of that fee is determined, users will not be able to publish their wearables. For more information, and to participate in the discussion, visit governance.decentraland.org.
After you’ve added all of the relevant metadata to the wearables in your collection, and you’ve set the price and beneficiary address (or made your items free!) you can begin the publication process.
First, navigate to the Builder and select the Collections tab. Select the collection you’d like to publish and click Publish.
You might have to authorize the MANA contract to operate MANA on your behalf. By granting this authorization, you are permitting the MANA smart contract to withdraw MANA from your balance to pay the publication fee and to deposit MANA into your account from future sales of your items. Simply check MANA and click Proceed. You will have to sign a message from your wallet, but there is no gas fee.
Publication fees
There is a required fee for publishing items. This fee exists to deter users from publishing an excessive number of wearables in an attempt to “spam” the wearables market.
After reviewing your total fee, click Next.
Warning! You will not be able to add or remove items in your collection after beginning the publication process. You will be able to see your items within the Decentraland Marketplace, but they will not be able to be bought, sold, or transferred until they have been approved.
For more detailed information on the publication and approval process, see Publishing Wearables.
When you are ready, click Publish and sign the message when prompted by your wallet.
Attributing collaborators
If you collaborated with other artists when creating your items, you can add attributions within the Wearables Editor. This can only be done after publishing a collection.
First, navigate to the Builder and select the Collections tab. Select the collection containing the items you want to add attributions to, click the … icon next to the Mint Items button, and select Collaborators.
To add collaborators, simply enter their Ethereum address, and click Add. You can add as many collaborators as you want. To remove a collaborator, simply click Remove next to the collaborator’s address.
Selling items
After your items are published in a collection and approved by the Curation Committee, they can be sold to other users in the metaverse.
Items can be sold in primary sales and secondary sales.
-
Primary sales are performed by the Decentraland Store’s smart contract. During a primary sale, the item is minted automatically, and it is sold for the price set by you in the Wearable Editor.
-
Secondary sales are performed by the Decentraland Marketplace’s smart contract. These occur anytime a user sells an item in the Marketplace after it has been minted or purchased in a primary sale. Items can be sold for any price in a secondary sale.
To view items available to purchase in a primary sale, head to the Decentraland store!
To view items available for secondary sales, visit the Decentraland Marketplace.
Primary sales
Primary sales occur when one of your items is purchased for the first time. These sales are only performed by the Decentraland Store’s smart contract.
When a user makes a primary purchase of one of your items, the store mints the item automatically, transfers the item to the purchaser, and sends the MANA proceeds to the beneficiary address.
Remember! You do not need to mint your items in order to sell them in primary sales!
To sell your items via primary sales, begin by navigating to the Builder and selecting the Collections tab.
Set the price and beneficiary address
Select the collection you would like to sell, and set the price and beneficiary for each item. The beneficiary address is the address that will receive the MANA resulting from a primary sale.
If the price you set for a primary sale is “Free”, users will be able to purchase your items at no cost in the store, but they can resell the item in a secondary sale at any price later on.
You can change the price and beneficiary address for any item in your collection at any time.
Enable primary sales
Finally, click the On Sale switch and click Turn On in the confirmation window that appears. When this switch is enabled, your collection will be available to purchase within the Decentraland store.
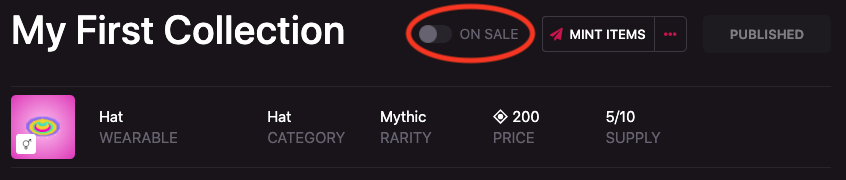
As long as this switch is turned on, the Decentraland store will automatically mint one of your items whenever a user makes a primary purchase.
This means that it is possible to mint and sell all of your available items until the maximum supply is reached. If you want to save one or more of your items before listing them for sale, you need to manually mint an item to one of your own wallet addresses.
Anyone who purchases one of your items is able to resell it at any time, and at any price, in a secondary sale in Decentraland’s Marketplace.
All primary sales within the Decentraland in-world store are subject to a 2.5% fee. This fee is transferred to the DAO.
If I sell an item via a primary sale, will I receive my MANA on Polygon? Yes, the proceeds of any items sold on Polygon will reside on the sidechain. You will have to pay a transaction fee if you want to transfer your MANA from the Polygon sidechain to the main Ethereum chain. You can do so from the Accounts page.
If you want to transfer MANA that you’ve earned from a wearable sale on the Polygon to the Ethereum main network, you will have to pay a gas fee at the bridge. For more information on the Polygon sidechain, please see this blog post.
Disabling primary sales
To unlist your items, click the On Sale switch to toggle it off. This will only apply to primary sales for your items.
Secondary sales
Items can be sold in secondary sales at any time, and for any price, in the Decentraland Marketplace only after:
- They have been minted, or
- they have been purchased in a primary sale
In other words, anybody who owns an NFT for a wearable can sell it in the Decentraland Marketplace. There are no royalties for wearables sold in secondary sales in Decentraland.
Minting wearables
Minting is the process of creating the actual non-fungible tokens (NFTs) based on the items you’ve uploaded to the Wearables Editor.
As with selling items in primary sales, you will not be able to mint any items within a collection until the review process is complete. If your collection is still under review, you will see the tag “Under Review” appended to your collection. After it has been reviewed and approved, the tag will change to “Published”, and you can begin minting your items manually.
Item rarities
When you publish a collection, each item in that collection has a rarity. This rarity is set by you when you upload an item, and is recorded in a smart contract. Rarities limit the total supply, or stock, that you can mint of any particular item.
The available rarities, and the maximum supply provided by each, are:
| Rarity | Limit |
|---|---|
| Unique | 1 |
| Mythic | 10 |
| Legendary | 100 |
| Epic | 1000 |
| Rare | 5000 |
| Uncommon | 10000 |
| Common | 100000 |
For example, if you have a collection with one Epic item, then you can only mint up to 1000 NFTs of that item.
The Polygon sidechain
All wearables in Decentraland are minted on the Polygon sidechain. This allows users to mint and transfer items without paying any gas fees (so long as these transactions are conducted solely on the Polygon sidechain).
How to manually mint your items
To mint published items, open the collection containing the items you’d like to mint, and click Mint Items.
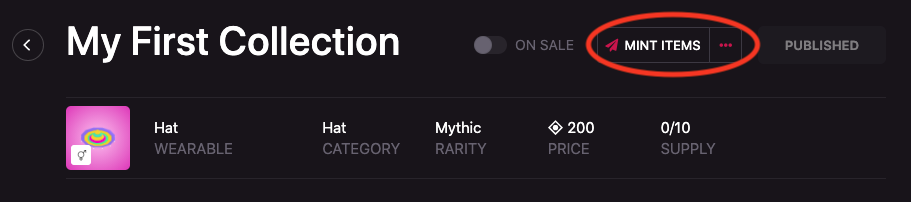
You will be shown a modal window containing a list of the items available along with the supply available for each. Remember, the supply is the total number of items you can mint. For example, if your supply reads 0/10, then you have used 0 out of your total supply of 10.
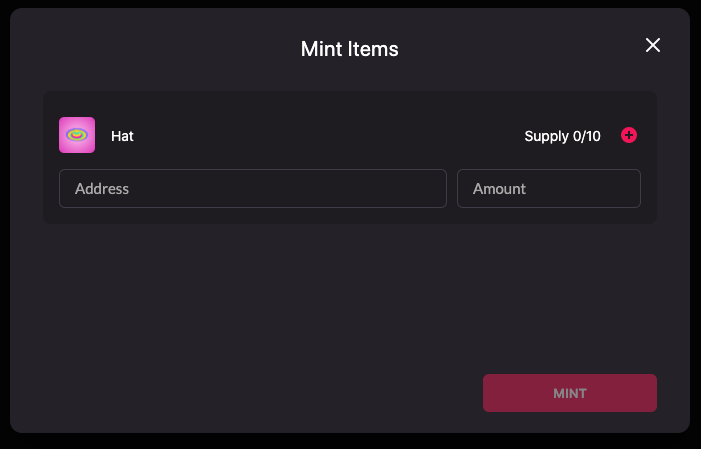
When minting, you must set the address that will receive the minted items and you must set the number of items you want to mint to that address. You cannot mint more items than are available in the supply available.
If you enter your own address, then the items that are minted will be transferred to your account.
You can “gift” items to anyone you like by entering their address instead of your own under Address.
Remember, these items are minted and transferred to the address entered for free. The price you set for items is only collected in primary sales.
Note: You can currently only mint 50 items per transaction.
Are there any fees associated with minting items? No, items are minted on the Matic sidechain, thus removing any fees traditionally associated with minting NFTs on the main Ethereum blockchain.